

Deploying CSR 1000v on ESXi — “A Required Disk Image Was Missing”
$ ovftool --name="CSR1"  --acceptAllEulas -ds="datastore1" --net:"GigabitEthernet1"="VM Network"  --net:"GigabitEthernet2"="VM Network" --net:"GigabitEthernet3"="VM Network"  /filepath/csr1000v-universalk9.16.03.06\ \(1\)\ copy.ova vi://192.168.1.13/
Opening OVA source: /filepath/Downloads/csr1000v-universalk9.16.03.06 (1) copy.ova
The manifest validates
Enter login information for target vi://192.168.1.13/
Username: root
Password: *********
Opening VI target: vi://root@192.168.1.13:443/
Deploying to VI: vi://root@192.168.1.13:443/
Disk progress: 4%

ovftool --name="KISE"  --acceptAllEulas -ds="datastore1" --net:"GigabitEthernet1"="VM Network"  --net:"GigabitEthernet2"="VM Network" --net:"GigabitEthernet3"="VM Network"  /filepath/csr1000v-universalk9.16.03.06\ \(1\)\ copy.ova vi://192.168.1.13/

Opening OVA source: /filepath/Downloads/csr1000v-universalk9.16.03.06 (1) copy.ova
The manifest validates
Enter login information for target vi://192.168.1.13/
Username: root
Password: *********
Opening VI target: vi://root@192.168.1.13:443/
Deploying to VI: vi://root@192.168.1.13:443/
Disk progress: 4%
./ovftool --noSSLVerify \
        --name="KISE"  \
        --acceptAllEulas \
        -ds="datastore1" \
        --diskMode=thick \
        --network="VM Network"  \
        /Users/vikassri/Downloads/ISE-2.1.0.474-mini.ova \
        vi://192.168.1.13/

./ovftool --noSSLVerify \
          --name="KISE"  \
          --acceptAllEulas \
          -ds="datastore1" \
          --diskMode=thin \
          --network="VM Network"  \
          /Users/vikassri/Downloads/Cisco_Firepower_Management_Center_Virtual_VMware-6.2.3-83/Cisco_Firepower_Management_Center_Virtual_VMware-ESXi-6.2.3-83.ovf \
          vi://192.168.1.13/


qemu-img convert -c -O qcow2 /opt/unetlab/tmp/0/c06281a8-161c-4aa5-aea4-4d304b13b6d4/1/megasasa.qcow2 /opt/unetlab/addons/qemu/vwlc-8.7.102/megasasa.qcow2


qemu-img convert -c -O qcow2 /opt/unetlab/tmp/0/c06281a8-161c-4aa5-aea4-4d304b13b6d4/1/virtioa.qcow2  /opt/unetlab/addons/qemu/win-7test/virtioa.qcow2
Ovftool with thin provisioning
./ovftool --acceptAllEulas -dm=thin -ds="datastore1" \
  --net:"External"="VM Network" --net:"Internal"="VM Network" --net:"Management"="VM Network" \
  Cisco_Firepower_NGIPSv_VMware-ESXi-6.2.0-362.ovf vi://192.168.1.13/
Downloading an ISO from an ESXi Datastore
wget --no-check-certificate --http-user=root --http-password=<PASSWORD> \
  'https://192.168.1.13/folder/OS_ISOs/W10X64.1709.ENU.DEC2017.iso?dcPath=ha%2ddatacenter&dsName=datastore1' \
  -O Windows.iso
If ESXi 6.x hangs on “Relocating modules and starting up the kernel”, see this guide.
Re-arranging iTerm
Thanks to http://azaleasays.com/2014/03/05/iterm2-merge-a-pane-back-to-window-or-tab-bar/
The secret key combination to drag a pane back to a window or to the tab bar is: command + shift + option, while dragging the pane body (not its header!). View the screencast below and you’ll figure it out:
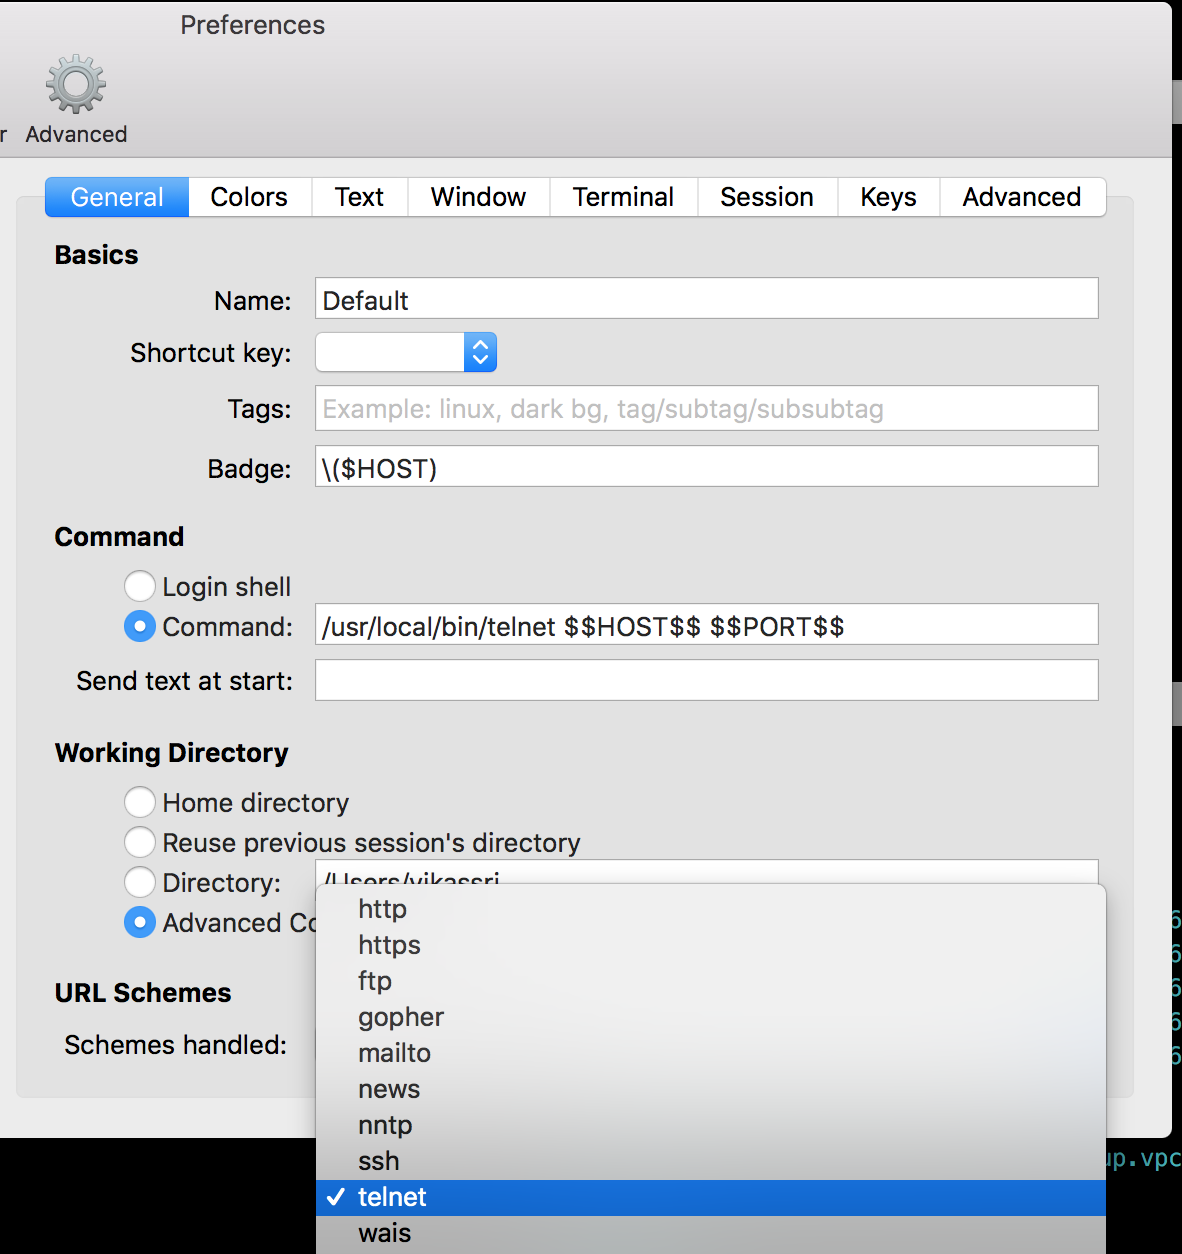
Having iTerm handle the telnet:// URL
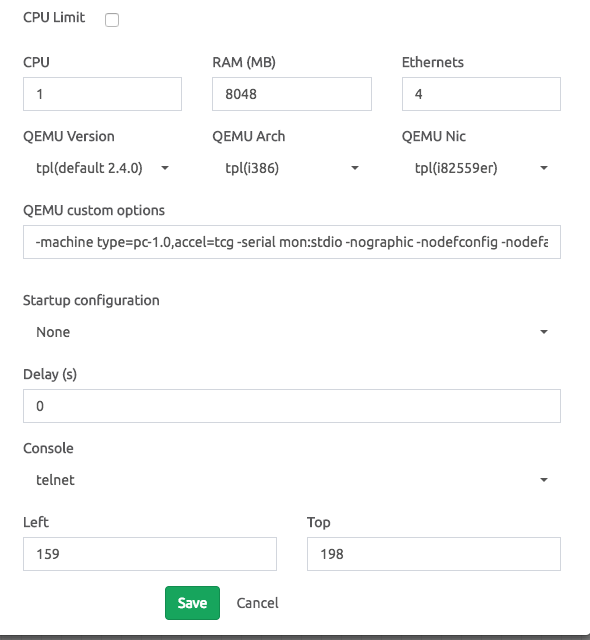
ASA in Eve-NG
Java Issues
On macOS, locate JavaAppletPlugin.plugin and open lib/security/java.security. Comment out the jdk.jar.disabledAlgorithms line.
Enabling Upgrades in the EVE-NG VM
If the EVE-NG repo is blocking upgrades, comment it out from the sources list:
root@vagrant-eve:~# cat /etc/apt/sources.list | grep eve
deb [arch=amd64] http://www.eve-ng.net/repo xenial main
# deb-src [arch=amd64] http://www.eve-ng.net/repo xenial main
Delete or comment the EVE repo reference to allow standard Ubuntu package upgrades.
X Window Forwarding
ssh -Y vikassri@192.168.1.195
TMUX Integration with iTerm2
tmux must be installed on the remote machine. Once connected via SSH:
tmux -CC— start a tmux session in iTerm2 integration modeCmd + N— new windowCmd + Shift + Option— rearrange windowsEsc— detach from the main windowtmux -CC attach— reattach to the previous arrangement


EVE-NG Issues
If EVE-NG becomes unresponsive, stop all running nodes and reinstall:
/opt/unetlab/wrappers/unl_wrapper -a stopall
apt update
apt install --reinstall eve-ng-pro